how to: remove ABS
- Thread starter TypeR?
- Start date
HondaDNA
New Member
http://www.team-integra.net/forum/display_topic_threads.asp?ForumID=15&TopicID=145853&ThreadPage=1
Originally posted by daily on Sep/16/05
>this is a guide that can be used to remove the ABS system on a 94-97 gen3 integra. it by no means includes every bit of information needed to remove the system, and i in no way take responsibility for anything becoming of the information in this guide. the ABS system is a safety device, and i would advise anyone to do thier research before deciding to remove it.
>why remove the ABS system?..
some dont like it, some need space in their engine bay, some do it for the
28lbs of weight reduction, and some may do it for cosmetic reasons.
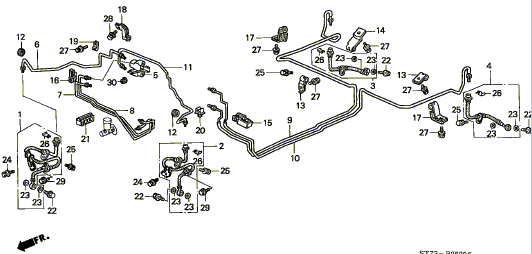
here is a diagram of the RS brake system

>what is needed?...
i would highly recommend a helms manual. it is an invaluble tool and is a nessecity for anyone wishing to do their own work on thier integra.
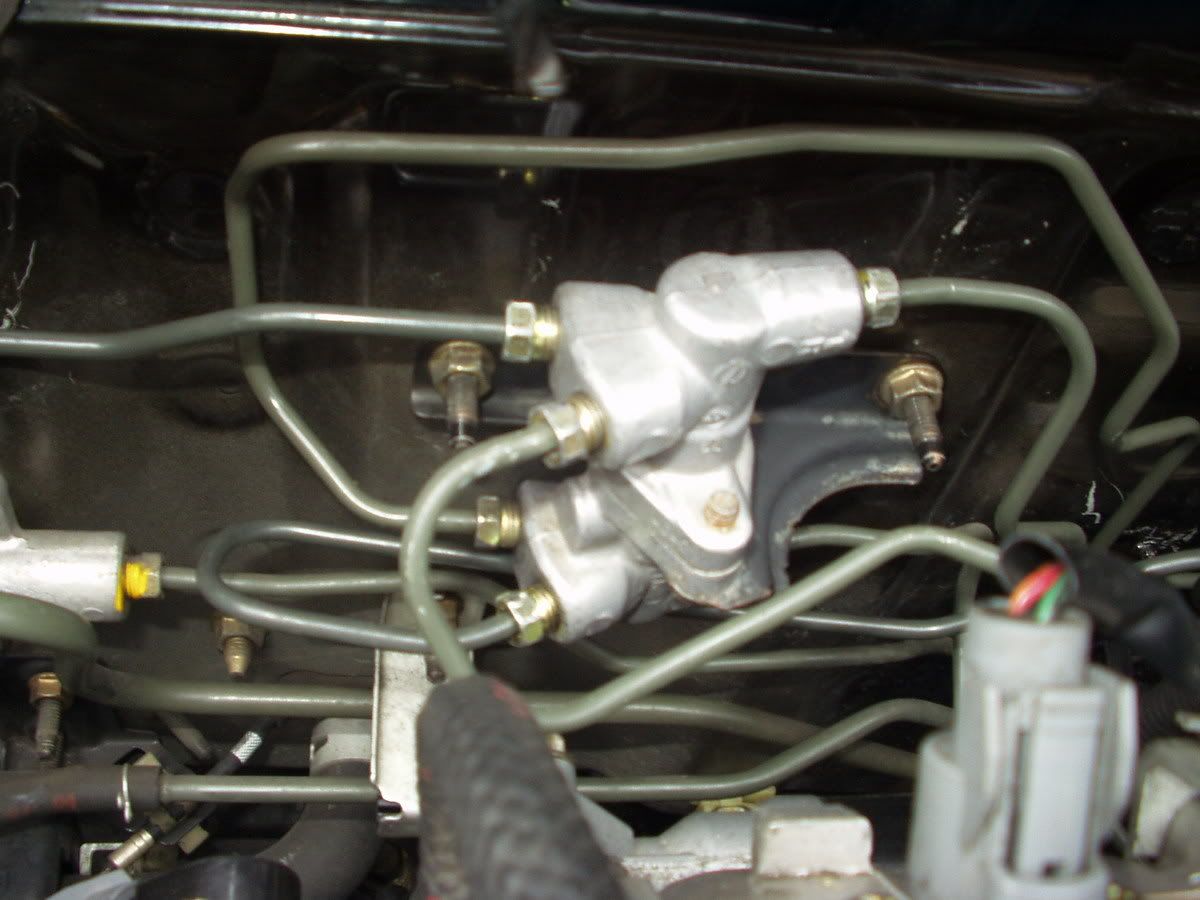
1)most importantly, a honda 40/40 prop valve. this distributes the brake fluid from the master cylinder to all four wheels. on the abs tegs (all except for RS) there is no prop valve because the abs motor distributes the brake fluid. these can be bought new from acura, or sometimes found used. this is what the prop valve looks like:

and this is what's in place of it on an abs teg:

2)the RS brake lines. the lines to the rear brakes are the same, but all front lines need to be replaced. these can be ordered new from acura, and ran me about $60 shipped. i ordered the lines from www.acuracarland.com and the part numbers are: 46360-SR3-A02 , 46321-ST7-A00 , 46320-ST7-A00 , 46310-ST7-A00 . these lines can be seen in the diagram above.
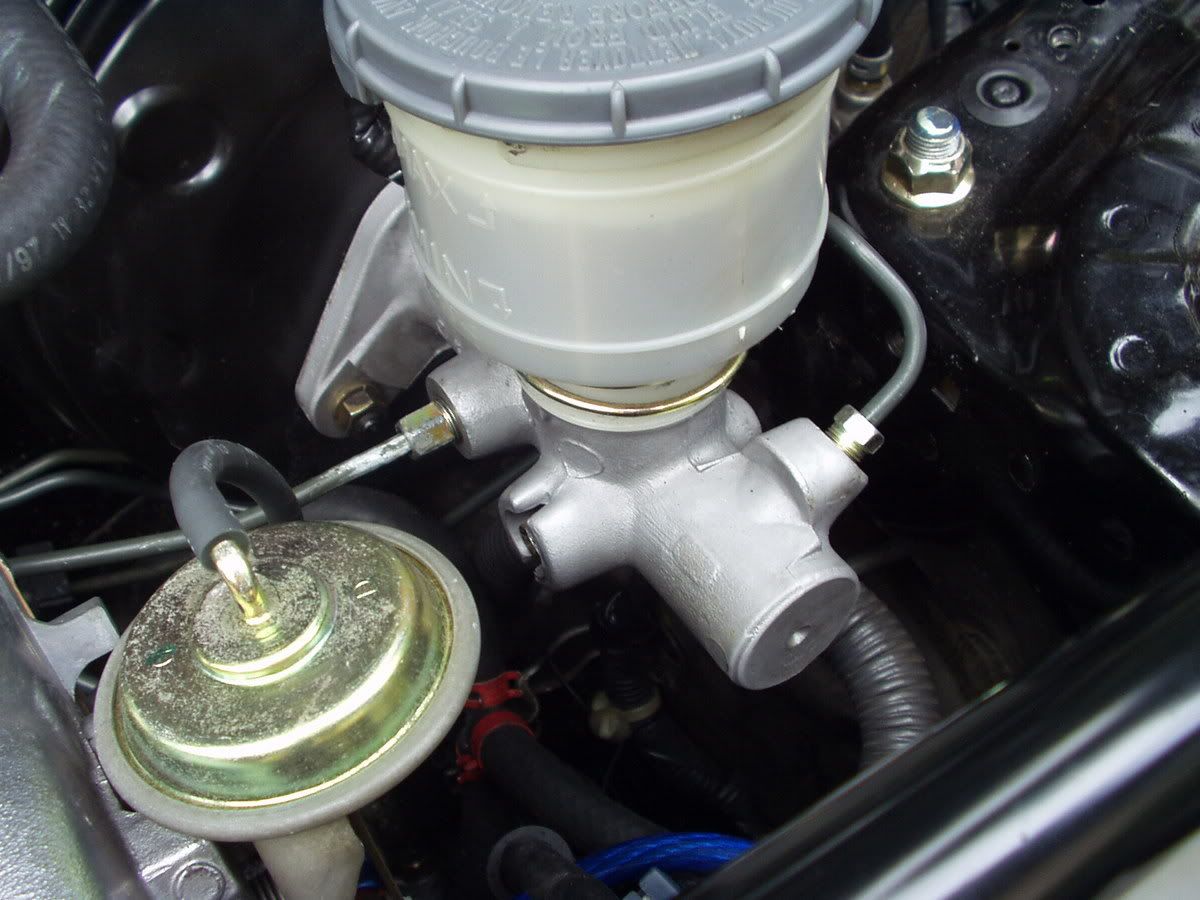
this is where i ran into some problems. the fitting for the brake hardline on the passenger's side of the master cylinder is larger than all of the other brakeline fittings. aparently, on the RS the fitting is the same size, so the new line will have the smaller fitting, which will not fit into the brake mc. what i did was purchase a double inverted flaring tool and cut both lines (new and old) at the mc end. i then slid the larger fitting onto the new line and flared the end with the flaring tool. this line will have to be bent to fit properly, but it isnt difficult.
this is the brake mc with the new line cut and refitted onto the left side

3)special tools.. there are a couple tools needed in additon to the regular socket set and screwdrivers. a 10mm flare nut wrench is imparative. this will be used on all the brake line fittings. do not use a regular wrench, it will damage the fittings. the double inverted flaring tool will also be needed, unless another method of adapting the correct fitting is used.
>removal guide
-start by draining all the brake fluid. i emptied it where the brake hardlines connect to the soft lines in each front wheel well and pumping the brake pedal.

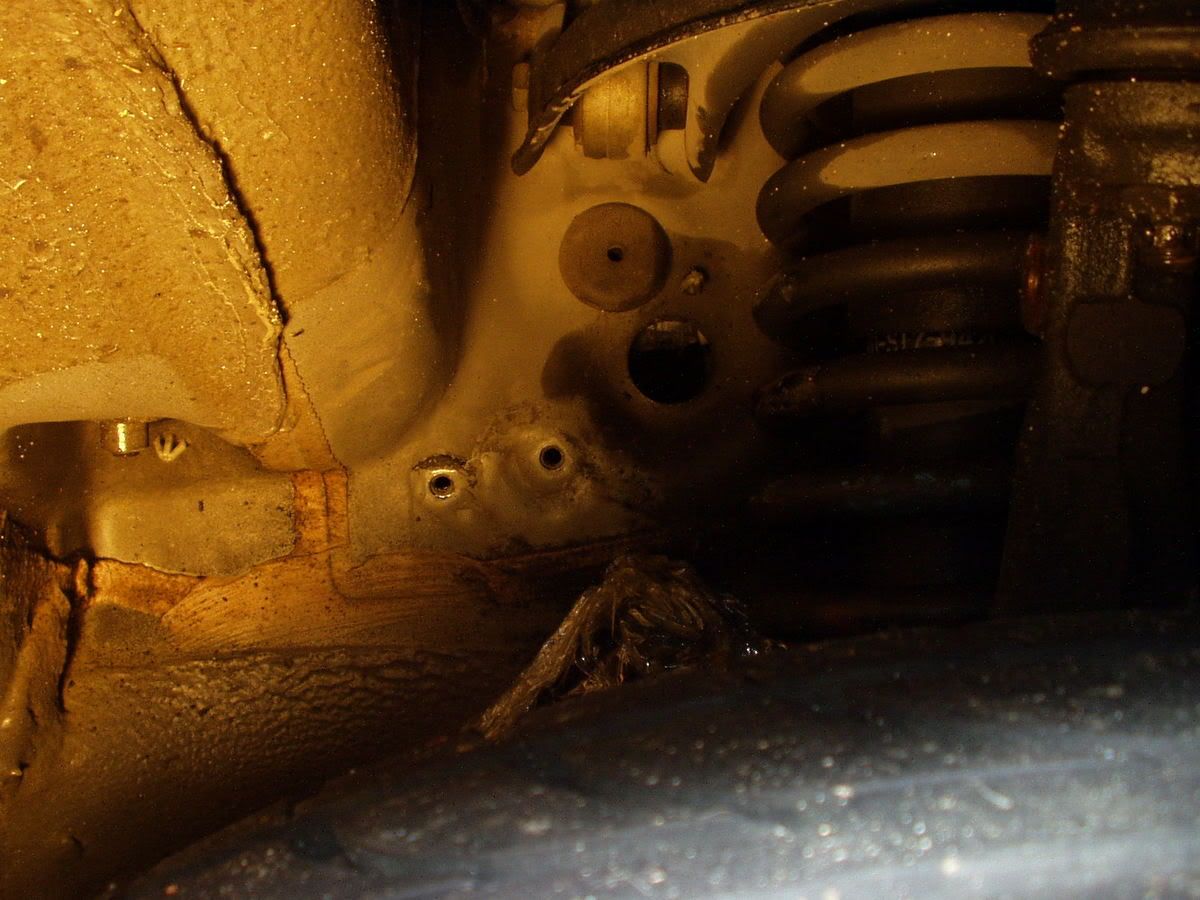
the hole where the rubber plug used to be is where the line comes out of the bay, and the seran wrap is covering the intersection of the harline to the softline.
-i then removed the ABS pump/motor. begin by removing all the lines going into the motor, then remove it's bracketing and pull the beast out. all the wiring simply unclips from their connections.

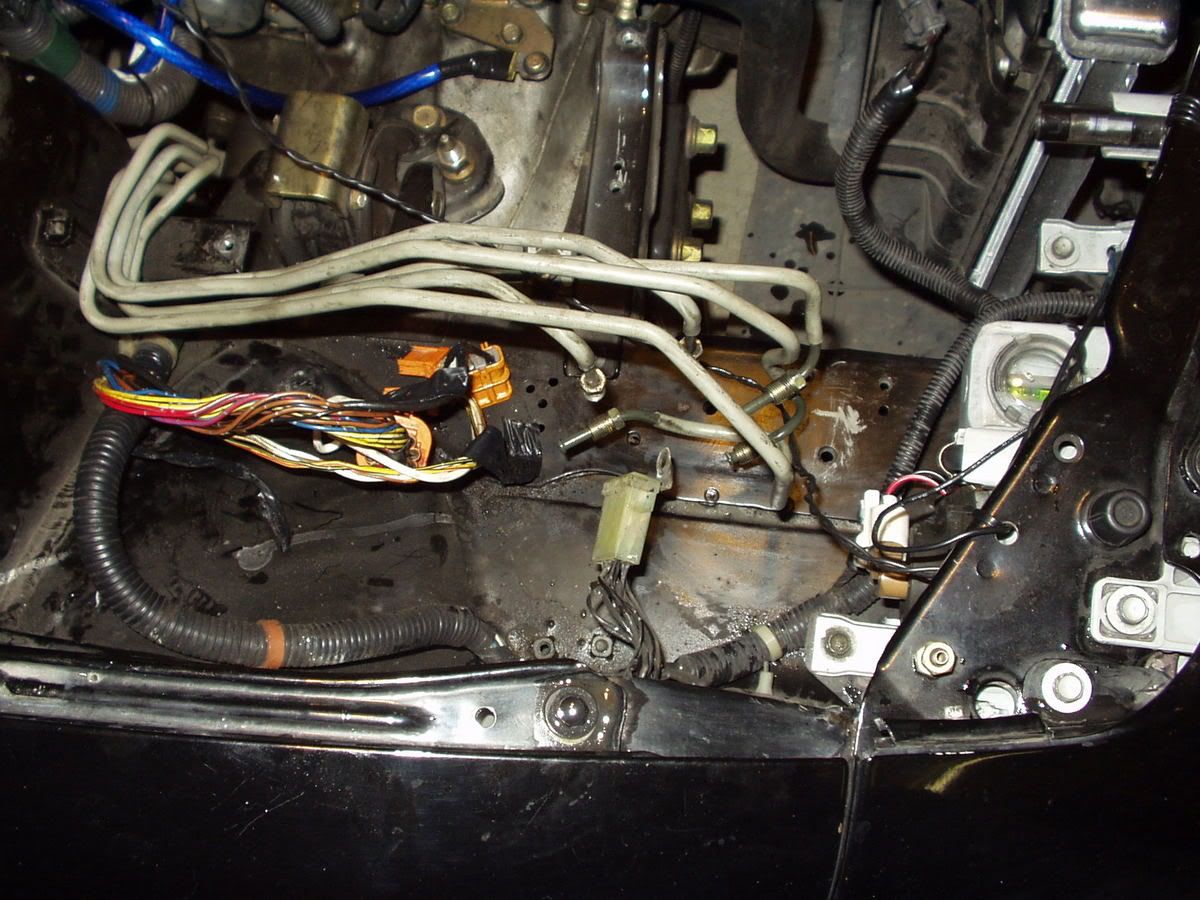
this is where the motor used to be, and the small black fusebox behind it can be removed as well.
-now the daunting task of removing all the hardlines. this by far encompassed more time than any other part of the removal. find a point to start and just begin unbolting. the airbox, battery, feul filter, and various other things will need to be removed out of the way. alot of the plastic clips holding the lines together are a bitch to get undone. take your time, dont get pissed, and take every line and bracket out. anything attached to the lines such as little valves will need to be removed. the only brake lines that will stay are the lines from the rear that come up the middle of the firewall together. make sure not to remove the feul or clutch fluid lines.
>installation
-bolt the prop valve to the firewall. there is already a space for it to fit in perfectly from the sideways H shaped valve removed with the old lines.
-start by attacthing the rear brake lines to the prop valve. the rear line on the right will go to the top right side of the prop valve and the rear line on the left will go on the bottom right side of the valve.
-the left front brake line will attach to the top left fitting closest to the firewall
-the right front brake line will attach to the bottom left fitting closest to the firewall
-the driver's side mc fitting will attach to the bottom left fitting farthest from the firewall
-finally, the passenger's side mc fitting will attach to the top left fitting farthest from the firewall. the line may need to be recut/bent/adjusted a few times before finally slipping the larger fitting on and flaring the end of the line.
-fill the resevoir on the mc and bleed the brakes using the normal procedure. heres the article
-check all the fittings for leaks and any other safety steps. take it for a close drive then re-check all the fittings.
allright well that about outlines the removal of the abs pump and fitting of the new hardlines and prop valves. i will add the removal of the computer and sensors when i have some more time. remember, this is only a guide and not a step by step. it is very hard to find any of this information, especially how the lines are alligned on the prop valve. hope this helps for all the people who have been asking. this portion will take a good 3 hours, +or- depending on how fast you are and how fast you can get the lines in and out. more to come -ryan
Slo_Teggy
Slow Driver
can I be the first to ask "why?"
I'm all about weight reduction but that is the 1 thing I am keeping for sure. It's such a safety feature. I've taken out airbags, but ABS is staying in. I can't stress how important it is. Track car or daily driver, it doesn't matter. ABS will help you out and could possibly be the difference between you coming to a stop or skidding your tires right in to someone.
I suggest keeping it.
It's not in english but you can still see the difference
[YOUTUBE="ABS test"]ZP40PoAPDOM[/YOUTUBE]
phatintegra
Banned
I'm now doing a wire tuck on the teg, real soon, not removing anything. I will updated my running log in the next couple weeks or so.
I think I be the only wire tuck that still have everything ABS, etc. still attached.
I think I be the only wire tuck that still have everything ABS, etc. still attached.
Last edited:
bradster101
New Member
BigMac88
Fat guy in a little 'teg
Actually, for a track car ABS is not ideal. When you put more aggressive pads on an ABS-equipped car, it can cause lock earlier than a non-abs car when threshold-braking. Many of us who go to the track on a regular basis also remove ABS because there's a lot more brake modulation available with a non-ABS car.can I be the first to ask "why?"
I'm all about weight reduction but that is the 1 thing I am keeping for sure. It's such a safety feature. I've taken out airbags, but ABS is staying in. I can't stress how important it is. Track car or daily driver, it doesn't matter. ABS will help you out and could possibly be the difference between you coming to a stop or skidding your tires right in to someone.
I suggest keeping it.
It's not in english but you can still see the difference
[YOUTUBE="ABS test"]ZP40PoAPDOM[/YOUTUBE]
ABS was invented for the 90% who fail at driving and have no pedal control or modulation capabilities. The vast majority of people pile-drive the brake pedal - which is totally fail. They need the ABS granny to save their asses because they suck.
A good driver has the brake/throttle/clutch modulation and control techniques mastered and can thus use no ABS to make a car go faster around a circuit, or more importantly make a car do what they want under braking with the proper inputs.
Basically, an ABS-delete is only a safety issue the person sucks at driving. To give you credit, most people suck at driving so I see some validity in your point haha
Joshmmc
New Member
ABS automates threshold braking.
http://en.wikipedia.org/wiki/Threshold_braking
So unless you're an expert at threshold braking, ABS will be beneficial, even on the track.
However, *On the Track* ABS will be a handicap to anyone who is very skilled at controlling their vehicle, and wants the most possible potential to manipulate it themselves with their own manual use of the threshold braking technique. A great driver who knows his vehicle well will outperform the computer intervention provided by ABS.
That being said, I would still recommend keeping your ABS if you drive your car on the street. In a panic situation, very few people will be able to perform better with threhold braking than with ABS. Under pressure, it's too much to keep track of and do perfectly, and if you don't do it perfectly, and you've sacrificed your ABS, you're at a higher safety risk.
A common misconception is that ABS reduces your maximum amount of brake pressure. This is false. ABS doesn't kick in until the computer has determined that your wheels are about to lock. Some people may drive their ABS equipped vehicle for years without ever experiencing the engagement of ABS.
Last edited:
BigMac88
Fat guy in a little 'teg
Well put. It's not only about threshold braking though. Any decent performance driver will be able to utilize ABS with no problems. A non-ABS car requires a more progressive feed-in than an ABS-equipped car. A non-ABS car also allows for more overall braking modulation and braking power. You are right though, the average driver is not proficient enough to remove ABS; its removal is a safety concern.ABS automates threshold braking.
http://en.wikipedia.org/wiki/Threshold_braking
So unless you're an expert at threshold braking, ABS will be beneficial, even on the track.
However, *On the Track* ABS will be a handicap to anyone who is very skilled at controlling their vehicle, and wants the most possible potential to manipulate it themselves with their own manual use of the threshold braking technique. A great driver who knows his vehicle well will outperform the computer intervention provided by ABS.
That being said, I would still recommend keeping your ABS if you drive your car on the street. In a panic situation, very few people will be able to perform better with threhold braking than with ABS. Under pressure, it's too much to keep track of and do perfectly, and if you don't do it perfectly, and you've sacrificed your ABS, you're at a higher safety risk.
A common misconception is that ABS reduces your maximum amount of brake pressure. This is false. ABS doesn't kick in until the computer has determined that your wheels are about to lock. Some people may drive their ABS equipped vehicle for years without ever experiencing the engagement of ABS.
Also, when upgrading pads (let's say to an HP+) the computer often senses the wheels 'locking' when they are not, and it causes the car to 'ABS' earlier than normal.
ABS DOES modulate braking pressure when it is active, that's how it keeps the wheels from locking. Which is bad when you're driving a car to its limits and need every ounce of stopping-power.
Overall, I think we're on the same page though :thumbs up
ABS is a fail-safe for car companies not wanting to get sued because the average person fails at car control haha. It DOES make braking easier and safer for the most part. But in a performance situation, a skilled driver would not prefer it for a time attack or racing situation.Soooo what bigmac is tryna say is... abs is a luxury. take it off if you want a challenge.
I say, start with ABS and learn proper brake pedal feed-in/modulation. THEN delete the ABS.
Last edited:
mirrorimg
Well-Known Member
Like what Nick and Joshmmc said, ABS is nice to have, but not mandatory. Your braking does not go to crap if its gone. Not all Integras came with ABS, hence the proportioning valve. Earlier cars didnt have ABS either, do they all wreck when they have to get on the brakes?
If you dont want to worry about brake control during heavy braking, i.e. pumping slightly to keep the wheels from locking up, then keep it.
If you dont want to worry about brake control during heavy braking, i.e. pumping slightly to keep the wheels from locking up, then keep it.


