OGstackadolla's Track Whore and Build Thread

OGstackadoIIa

TEAM LlGHTSPEED RACING
I think I have the wrong lines from the master to the prop. There is no way to make them fit without bending the shit out of them. The other lines fit for the prop to calipers pretty well, but it seems like the mc to prop lines are for a rhd
 

simplels

New Member
i think for the line going to the MC you have to cut it, bend it, and re-flare the end..

"installation

-bolt the prop valve to the firewall. there is already a space for it to fit in perfectly from the sideways H shaped valve removed with the old lines.

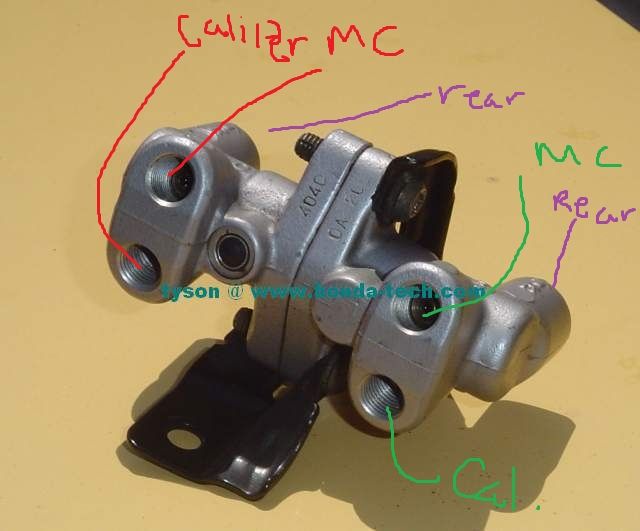
-start by attacthing the rear brake lines to the prop valve. the rear line on the right will go to the top right side of the prop valve and the rear line on the left will go on the bottom right side of the valve.

-the left front brake line will attach to the top left fitting closest to the firewall

-the right front brake line will attach to the bottom left fitting closest to the firewall

-the driver's side mc fitting will attach to the bottom left fitting farthest from the firewall

-finally, the passenger's side mc fitting will attach to the top left fitting farthest from the firewall. the line may need to be recut/bent/adjusted a few times before finally slipping the larger fitting on and flaring the end of the line.

-fill the resevoir on the mc and bleed the brakes using the normal procedure. heres the article

-check all the fittings for leaks and any other safety steps. take it for a close drive then re-check all the fittings.

allright well that about outlines the removal of the abs pump and fitting of the new hardlines and prop valves. i will add the removal of the computer and sensors when i have some more time. remember, this is only a guide and not a step by step. it is very hard to find any of this information, especially how the lines are alligned on the prop valve. hope this helps for all the people who have been asking. this portion will take a good 3 hours, +or- depending on how fast you are and how fast you can get the lines in and out. more to come."

quoted from someone named "ryan" on TI

hope that helps..


Last edited:

Samurai_Blue

Yolo Whippin'
I think I have the wrong lines from the master to the prop. There is no way to make them fit without bending the s*** out of them. The other lines fit for the prop to calipers pretty well, but it seems like the mc to prop lines are for a rhd
lines to calipers should be black or black on one end.

I really forget how they look at the MC

but this is the difference between mine and yours mine is #1 and yours is #2


This is how i did my 4040 prop valve


7 and 8 go to the MC

better appreciate that 4040 valve picture because i drew that shit
 
Last edited:

OGstackadoIIa

TEAM LlGHTSPEED RACING
i think for the line going to the MC you have to cut it, bend it, and re-flare the end..

"installation

-bolt the prop valve to the firewall. there is already a space for it to fit in perfectly from the sideways H shaped valve removed with the old lines.

-start by attacthing the rear brake lines to the prop valve. the rear line on the right will go to the top right side of the prop valve and the rear line on the left will go on the bottom right side of the valve.

-the left front brake line will attach to the top left fitting closest to the firewall

-the right front brake line will attach to the bottom left fitting closest to the firewall

-the driver's side mc fitting will attach to the bottom left fitting farthest from the firewall

-finally, the passenger's side mc fitting will attach to the top left fitting farthest from the firewall. the line may need to be recut/bent/adjusted a few times before finally slipping the larger fitting on and flaring the end of the line.

-fill the resevoir on the mc and bleed the brakes using the normal procedure. heres the article

-check all the fittings for leaks and any other safety steps. take it for a close drive then re-check all the fittings.

allright well that about outlines the removal of the abs pump and fitting of the new hardlines and prop valves. i will add the removal of the computer and sensors when i have some more time. remember, this is only a guide and not a step by step. it is very hard to find any of this information, especially how the lines are alligned on the prop valve. hope this helps for all the people who have been asking. this portion will take a good 3 hours, +or- depending on how fast you are and how fast you can get the lines in and out. more to come."

quoted from someone named "ryan" on TI

hope that helps..
Thanks. Ill forward that part to him

my asian eyes made it look like your front end got hit or something.

great build patrick. a lot of great work.
Thanks dude. Can't wait to see how it all looks when I get finished


cody1018

Member
Its coming along nicely.
From going to a DD to Racecar haha.
When do you plan on dropping the bigboy engine in?
 

OGstackadoIIa

TEAM LlGHTSPEED RACING
Hahaha, that engine is my friend's. He just got it back from LDL Speed Shop in Vegas, getting ready to drop it into his Ej coupe
 

OGstackadoIIa

TEAM LlGHTSPEED RACING
I'm itching to see it all finished. Lol. I'm waiting for Vince to come pick me up so we can finish it all. Idk how far he got

Wrote that before I left.

Got suspension and sway bar installed and abs delete finished


Splitter no air dam


I have more photos but tapatalk won't let me download. Fucking fags
 

Nick_C78

New Member
Try extra hard not to go off track with that thing man. Would hate to see you tear up the splitter on the first time out.
 
Top